Thursday, July 26, 2012

Dutch Babies (aka German Pancakes)

This is another recipe that's been sitting in my box, waiting to be made. Most people call these German pancakes, but I was looking at one recipe that had a review from a woman who was actually German, and she said true German pancakes would be heavy and fried in oil. These definitely are not, so I'm going with the more fun name of Dutch Babies. This is actually a mix of a couple different recipes, and it worked for us. I ended up cutting it in half since it was just the boys and I (and partially since I've become stingy with eggs since they got so expensive), but it was gone so quickly that I probably should have made the full batch. Sorry for the rushed picture. I had two boys fighting over who was going to smell the pancake.

Printable Recipe

Dutch Babies


4 Tbsp. butter
6 eggs
1 cup flour
1 cup milk
1/2 cup sugar
Pinch of salt


Preheat oven to 400.

Place butter in 9 x 13 pan (or 2 round pans) and let melt in oven as it preheats. Do not let the butter brown.

Combine eggs, flour, milk, sugar and salt. Whisk until smooth.

Pour batter into pan and bake for 15-20 minutes, or until middle is set and edges are puffed up and brown.

Serve with syrup, fruit, whipped cream, or powdered sugar & lemon juice. (We did the latter because that's my favorite way to do crepes--you can skip the lemon juice if you want.)

Monday, July 23, 2012

Red Pepper Chicken

This is another one of those "trust me" recipes. We got this from my brother-in-law Carlos, and I can't quite remember if it's one he made up or something that they eat in Chile (or Cuba--sorry, family joke but I couldn't help it). I think it's the latter--but Chile, not Cuba. Oh my, I'm off to a rough start. Anyway, we didn't really have a name for this, so I always called it Pulverized Chicken, which isn't the most appetizing name. And the picture doesn't make it look so great either, but it really, really is! Again, trust me. We either put it on warm French bread, as pictured, or it's great as a dip with Club crackers, or you can make it a regular sandwich. So yummy! Even my boys, who proclaim every time they see a red pepper that they HATE peppers, will eat this. And bonus that it's pretty easy. With the mayonnaise, I'm totally guessing on the quantity. I never measure, just add until it's a creamy consistency like the picture.

Printable Recipe

Red Pepper Chicken


1 red pepper
2 large boneless chicken breasts, frozen or thawed
1/2 cup mayonnaise (maybe more)
Salt to taste


Cut red pepper in half. Remove seeds and stem.

Place chicken in a pot of water. Boil until almost cooked through, then add pepper to boiling water.

Continue boiling until pepper is soft.

Drain water; roughly chop chicken and pepper.

Place into food processor and process until everything is finely chopped.

Add mayonnaise and salt, and process again. Add more of each as needed for taste.

Serve on French bread, with crackers, or as a sandwich.

Sunday, July 22, 2012

Peanut Butter Fudge Iced Brownies

I've had the recipe for this old-fashioned peanut butter icing stored away for awhile and finally got around to making it. It's probably good I waited, since I keep sneaking in and cutting off a piece of brownie when no one's looking. One of my boys even declared it as "the best brownie I've ever had." Should I be offended that I took the quick way out and made a boxed mix instead of making some of my other amazing brownies? This one is the best? Technically it's more about the icing, so I can accept that.

Printable Recipe


Peanut Butter Fudge Iced Brownies
from Southern Plate


1 box brownie mix, prepared according to package directions (or your favorite recipe)
1-1/2 cups sugar
7 tablespoons milk
2 tablespoons shortening
2 tablespoons margarine
1/4 teaspoon salt
1 teaspoon vanilla
1/2 cup creamy peanut butter


Prepare brownies according to package directions and allow to cool completely before beginning icing.

In heavy saucepan combine the sugar, milk, shortening, margarine, and salt.

Bring to a rolling boil while stirring constantly.

Once it reaches a rolling boil, stop stirring and let boil for two minutes.

Remove from heat and quickly stir in the vanilla and peanut butter.

Beat until smooth and quickly spread over the brownies.

Allow to cool completely and then serve.

Tuesday, July 17, 2012

Strawberry Shortcake

No real recipe, but we made a few loaves of Strawberry Pecan Bread, and I thought we should use it for the base of Strawberry Shortcake like I had mentioned. AMAZING!!! By far the best strawberry shortcake I've ever had! Seriously, please make this soon. And invite me over for some.


Strawberry Shortcake


Sunday, July 15, 2012

Pita Bread

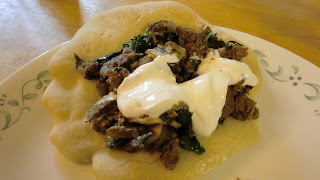
It's been far too long since I posted, I know. Life got a little crazy--finishing up Joy School for the year, getting ready to move, starting my business, and a hundred million other things. But I've still been making lots of new recipes, so there are plenty saved up to share. I wanted to start with this pita bread because I've had it saved in my file for a long time, but anytime there's a bread recipe, I automatically think it's going to be difficult and take forever. Not so! This one is very simple--you add all of the ingredients in the first few minutes, and while there's some wait time, it's not nearly as long as you would think. And it ends up being another one of those "I can never buy these from the store again because these are SO much better homemade" recipes, which is another reason it's so nice that it's a fairly simple recipe. We made these to use with Beef and Vegetable Pitas, and wow is all I can say.

Printable Recipe
Pita Bread


3 cups flour, plus 1/2-3/4 cup more as needed
1 ½ tsp. salt
1 tbsp. sugar or honey
1 packet instant (RapidRise) yeast (this equals 2 1/4 tsp.)
1 ¼ to 1 ½ cups water, roughly at room temperature
2 tbsp. olive oil, vegetable oil, butter or shortening


Mix the flour, salt, sugar and yeast.

Add the olive oil and 1 ¼ cup water and stir together with a wooden spoon until it forms a ball.  If some of the flour will not stick to the ball, add more water.

Place the ball on a work surface, and knead the dough for approximately 10 minutes. If you are using an electric mixer, mix it at low speed for 10 minutes. As the dough is mixing, continue to add flour, a tablespoon or two at a time, until the dough clears the sides of the bowl and is tacky but not sticky.  (I add a significant amount of flour, so don’t be afraid to keep adding more until you reach the right consistency.)

Place the dough in a bowl that has been lightly coated with oil. Form a ball out of the dough and  roll it around so that it has a light coat of oil on all sides. Cover the bowl with plastic wrap or a damp towel and set aside to rise until it has doubled in size, approximately 90 minutes.

When it has doubled in size, punch the dough down to release some of the trapped gases and divide it into 8 equal pieces.  

Roll each piece into a ball, cover the balls with a damp kitchen towel, and let them rest for 20 minutes. This allows the dough to relax so that it will be easier to shape.

Spread a light coating of flour on a work surface and place one of the balls of dough there. Sprinkle a little bit of flour on top of the dough and use a rolling pin or your hands to stretch and flatten the dough. You should be able to roll it out to between ¼ – 1/8” thick – 6 inches in diameter. If the dough does not stretch sufficiently, you can cover it with the damp towel and let it rest 5-10 minutes before trying again.
 
Place discs on a lightly greased baking sheet or parchment paper and let rise, uncovered, until barely doubled in thickness, about 30-45 minutes.

While the dough is rising, preheat the oven to 450°. If you have a baking stone, put it in the oven to preheat as well. If you do not have a baking stone, turn a cookie sheet upside down and place it on the middle rack of the oven while it is preheating. This will be the surface on which you bake your pitas.

Once the dough has risen, open the oven and place as many pitas as you can fit on the hot baking surface. They should be baked through and puffy after 3 minutes. If you want your pitas to be crispy and brown you can bake them for an additional 3 to 5 minutes, but it isn’t necessary.

Makes 8 pitas