Tuesday, November 20, 2012

Pecan Pie

This is a recipe from my grandmother. We've been making this version as long as I can remember. The few times I've tried something else, it's been a disaster, and we always run back to this one. Enjoy!

Printable Recipe

 Pecan Pie


3 eggs
2/3 cup sugar
1/3 tsp. salt
1/3 cup butter, melted
1 cup dark corn syrup (or light, for a slightly less sweet pie)
1 tsp. vanilla
1 cup pecan halves
1 9-inch pie crust


Beat eggs well.

Add sugar, salt, melted butter, corn syrup and vanilla. Mix until combined.

Add pecans. Pour into pie crust.

Bake at 350 for 50 minutes or until knife inserted halfway between outside and center of filling comes out clean.

Cool before serving.

Monday, November 19, 2012

Paula Deen's Pumpkin Pie

Thanksgiving is almost here, and I can't believe I haven't posted this recipe yet. By far my favorite pumpkin pie recipe. It always turns out well and is very light and creamy. This is Paula Deen's recipe, but I can't believe there's only half a stick of butter! :)


Pumpkin Pie


1 (8-ounce) package cream cheese, softened
2 cups canned pumpkin, mashed
1 cup sugar
1/4 teaspoon salt
1 egg plus 2 egg yolks, slightly beaten
1 cup half-and-half
1/4 cup melted butter
1 teaspoon vanilla extract
1/2 teaspoon ground cinnamon
1/4 teaspoon ground ginger, optional
1 piece pre-made pie dough
Whipped cream, for topping


Preheat the oven to 350 degrees F.

Place 1 piece of pre-made pie dough down into a (9-inch) pie pan and press down along the bottom and all sides. Pinch and crimp the edges together to make a pretty pattern.

Put the pie shell back into the freezer for 1 hour to firm up.

Fit a piece of aluminum foil to cover the inside of the shell completely. Fill the shell up to the edges with pie weights or dried beans (about 2 pounds) and place it in the oven. (I don't have pie weights, so usually I just prick holes in the crust, put the foil on, and don't worry about weighing it down.)

Bake for 10 minutes, remove the foil and pie weights, and bake for another 10 minutes or until the crust is dried out and beginning to color.

For the filling, in a large mixing bowl, beat the cream cheese with a hand mixer.

Add the pumpkin and beat until combined.

Add the sugar and salt, and beat until combined.

Add the eggs mixed with the yolks, half-and-half, and melted butter, and beat until combined.

Finally, add the vanilla, cinnamon, and ginger, if using, and beat until incorporated.

Pour the filling into the warm prepared pie crust and bake for 50 minutes, or until the center is set.

Place the pie on a wire rack and cool to room temperature.

Cut into slices and top each piece with a generous amount of whipped cream.

Wednesday, October 10, 2012

KFC Biscuits

We had these biscuits when we were visiting friends, and even though they were a day old, I had to have the recipe. So, so good! They're supposed to be a copycat of KFC biscuits, but I like them even more than those. Yum!

Printable Recipe
Biscuits


2 cups flour
1 tsp. salt
3 tsp. sugar
4 tsp. baking powder
1 cup milk or buttermilk
1/2 cup butter, softened


Preheat oven to 425

Sift together flour, salt, sugar and baking powder.

Make a well in the flour mix and add the milk.

Add butter and begin kneading until thoroughly mixed.

Pat into 1/2 inch thickness, then cut into biscuits.

Bake for 10-13 minutes.

Makes about 12 biscuits.

Monday, October 8, 2012

Best No-Knead Pizza Dough Ever

I wanted to get this out there early in the week, just in case you're like me and plan for Pizza Night on Fridays. I have tried a lot of pizza dough recipes. A LOT!!! And so many of them claim to be the best. But after all is said and done, I'm left thinking, "That's the best you've got?" So I've had this one tucked away on Pinterest for quite awhile, but by the time I saw it, I'd grown tired of making my own, barely decent, dough, and we'd gone to frozen pizza. Plus the "18 hours" of resting time scared me (PLEASE DON'T STOP READING!). When I looked at it again, I realized that while, yes, you do have to be thinking ahead for this one, the dough takes about 5 minutes to measure out and mix up, and then it just sits there. So all I have to do is remember sometime Thursday evening to whip it up, and then we're good for dinner Friday. And actually, the original blogger who posted it said it's very forgiving, and one time she only let it rise for 5 hours and it still turned out great, so even better! Just don't forget the extra hour at the end that you're supposed to let it sit (although I think I only did half an hour last time; again, forgiving).

I did the "heat a pizza stone first" trick, and the result was absolutely amazing! Not super thick and doughy, just thin enough without being overly so, and enough crunch to keep me from thinking I'd made fancy breadsticks instead. Much closer to restaurant style than I've ever accomplished before. I only had one stone, so I used an upside down cookie sheet for the other, and it was still great. (I have no idea why I turned it upside down, so don't ask.) And we freeze the third ball of dough, so by the third week, I don't even have to remember to make it because I have enough for two pizzas that just need to be thawed!

Printable Recipe

 No-Knead Pizza Dough


Yield: about 3 balls of dough (you can easily double this recipe)

3 3/4 cups (500 grams) unbleached all-purpose flour (I used bleached, just because that's what I had on hand)
1/4 teaspoon active dry yeast
1 1/2 teaspoons fine sea salt
1 1/2 cups warm water (be sure not to use really hot water as that will kill the yeast)


In a medium bowl combine the flour, yeast, and salt.

Gradually add the water, stirring with a wooden spoon, until the water is incorporated and a shaggy dough forms. You may need to use your hands to fully incorporate the water. Just remember, you don't need to knead!

Shape the dough into a ball and transfer to a clean large bowl.

Cover with plastic wrap and let rise at room temperature in a draft-free place until the dough is doubled in size. This may take up to 18 hours, depending on how warm your kitchen is. Don't worry too much about the time as this dough is very forgiving.

Transfer the dough to a floured work surface.

Divide into 3 equal portions.

Take one portion of dough and gather 4 corners to the center to create 4 folds.

Turn seam side down and roll into an even ball.

Repeat with remaining portions.

Let dough rest, covered, until soft and pliable, about 1 hour.

Preheat oven and pizza stone to 425.

Roll dough to desired shape.

Take pizza stone out and carefully slide the dough onto the stone.

Bake for 10-12 minutes, or until golden.

Top with favorite toppings.

Bake for another 10-12 minutes or until done.


The dough can be made ahead of time: Refrigerate the dough, individually wrapped in plastic, for up to 3 days. Unwrap and let rest at room temperature, covered in plastic wrap, for 2 to 3 hours before shaping.

Freeze the dough, individually wrapped in plastic and placed in Ziploc bags, for up to 1 month. Defrost the dough overnight in the fridge then allow to sit at room temperature as directed above before shaping.

The dough is now ready to be shaped into pizza or whatever else you desire.

Sunday, October 7, 2012

Chicken Gnocchi Soup

I am not a soup person. Every time I find what looks like a good recipe, I still think to myself, "Soup's not a meal." But then there is this one. Oh, my, gosh! I am having a love affair with this soup. (And if anyone can tell me the three t.v. shows I've pulled from in the last four sentences, you have my admiration.) Wow, is it amazing! Honestly, you've got to try it. It's a copycat recipe for the Chicken Gnocchi soup at Olive Garden, and even if it's not right on target (I couldn't remember well enough to compare), it doesn't even matter because it's so good on it's own that I don't even care. Make it as soon as you can!

I left out the celery (which I hate), and I did not use the whole rotisserie chicken like the original recipe because it seemed like too much.

Printable Recipe

Chicken Gnocchi Soup


Time: 30-40 minutes total    Yield: about 12 servings

1 medium onion, chopped
2 large carrots, peeled and grated
4 stalks celery, chopped
6 cloves garlic, peeled and chopped
2-3 Tbsp. olive oil
2 cups Rotisserie Chicken + 1 C reserved broth from the bottom of the chicken container (if you don't have enough, I just used regular chicken broth to supplement)
7 cups water
8 chicken bullion cubes
1 (16 ounce) package Potato Gnocchi
4 cups half and half

1 1/2 cups spinach, chopped
1 tsp thyme
1/8 tsp nutmeg
1 Tbsp sugar
2 Tbsp butter
1/4 cup cold water
5 Tbsp cornstarch
salt and pepper 


Peel and chop onion and garlic; peel and grate carrots; chop celery.

Heat a large pot up over medium high heat. Pour 2-3 tablespoons of Olive Oil into it.

When the oil is hot, add the vegetables into the pan. Cook them over medium high heat, stirring occasionally for about 5-8 minutes or until the onions are translucent. 

Pour the broth that is left in the bottom of the chicken package into a large measuring cup. If needed, add extra canned or homemade broth to make 1 cup.
  
Pull the skin off of the chicken, and take the meat off of the bones. Chop it up with a sharp knife.

When the vegetables are done cooking, pour the broth from the chicken and 7 cups of hot water into the pot.

Add 8 chicken bullion cubes and stir.

Add 2 cups of chopped chicken and bring the soup to a boil.

Pour Gnocchi into the pot. Let the soup come to a boil again and allow the gnocchi to cook for about 3-4 minutes. The gnocchi will be cooked  through when they float to the top of the broth, which should happen pretty fast.

Chop about 1 1/2 cups of spinach and add to the pot.

Pour in 4 cups of Half and Half, 1 teaspoon dried thyme, 1/8 teaspoon nutmeg, 1 tablespoon sugar and 2 tablespoons of butter. Stir and then let it come to a boil. 

In a small bowl, combine 1/4 cup cold water and 5 tablespoons of cornstarch. Mix it well and pour it into the soup pot.

Bring the soup to a boil, while you stir. It will thicken as the soup reaches a boil. 

Taste it and season to your liking with salt and pepper. 


Serve with: Breadsticks, Salad

Wednesday, October 3, 2012

Cinnamon Bun Popcorn

It's rainy and cold, so it felt like a good day for fall treats. I found this recipe in my search for a good caramel corn. Amazing! And I actually had all of the ingredients (except almond bark, so I substituted white chocolate morsels and it worked out just fine). Twelve cups of popcorn might sound like a lot, but it's really not. This would be a great one to hand out as gifts. We also used the caramel mixture to make a caramel apple--definitely my go to recipe to make those in the future. SO much better than the bag of caramels.

Printable Recipe

 Cinnamon Bun Popcorn


12 cup popped popcorn (about 1/2 C kernels)*
1 cup roughly chopped pecans
1 cup brown sugar
3/4 tsp cinnamon
1/4 cup light corn syrup (or honey makes a good substitution)
1 stick real butter (1/2 C)
1/2 tsp. baking soda
1 tsp. vanilla
3 squares almond bark (or 1/2-3/4 cup white morsels and 1 TBSP shortening)

*You can use air popped or microwave popcorn. If using microwave, it's better to use a “natural” flavor that’s low in butter and salt.

Preheat oven to 250 degrees

Place popped popcorn and chopped pecans in a large bowl and set aside.

Combine brown sugar and cinnamon in a 2-qt, microwave-safe bowl. Mix well.

Chop butter into chunks and place on top of sugar mixture.

Pour corn syrup (or honey) over the top of everything.

Microwave on high for 30 seconds and then stir to combine.

Return to microwave and heat for 2 minutes.

Remove and stir and then microwave for 2 minutes more.

Remove from the microwave and add in vanilla and baking soda.

Pour the caramel over the popcorn and pecans.

Stir immediately until everything is well coated.

Spread popcorn mixture onto a foil-lined jelly roll pan.

Place in oven and bake for 30 minutes, stirring every 10 minutes.

Give it a final stir and spread it out on a clean piece of parchment, waxed paper, or foil.

Melt the almond bark according to package directions. If using white morsels, place in microwave-safe bowl with the shortening, and microwave in 30-second intervals, stirring each time, until melted.

Drizzle over the popcorn mixture; allow it to harden, then break into pieces and enjoy!

Saturday, September 1, 2012

Caramel-Stuffed Apple Cider Cookies

It's already September?! Every year keeps flying by faster. I've tried to hold off on the "fall" recipes, but it's felt like fall here in Alaska since mid-July, so I can't stop myself anymore. These cookies are so amazingly good. C'mon, apple-flavoring and caramel mixed in a cookie? How can you resist? You can either eat these straight out of the oven (give them just a couple minutes to cool off though--that caramel gets HOT!) or warm them for just a few seconds in the microwave. They're best if the caramel is soft and gooey

Printable Recipe


Caramel-Stuffed Apple Cider Cookies


1 cup butter, very softened
1 cup granulated sugar
1/4 teaspoon salt
1 (7.4 ounce) box Alpine Spiced Apple Cider Instant Original Drink Mix *Not sugar free*
2 eggs
1 teaspoon vanilla extract
1 teaspoon baking soda
1/2 teaspoon baking powder
1 teaspoon cinnamon
3 cups all-purpose flour
1 (14 ounce) bag Kraft Caramels


Preheat oven to 350 degrees F (190 degrees C).

Line rimless cookie sheets with parchment paper. (I used my Silpat--had a little trouble with some of the caramel, but in a pinch, it works.)

In a small bowl whisk together flour, baking soda, baking powder and cinnamon.

In a stand mixer, cream together butter, sugar, salt, and all 10 packets of apple cider mix until smooth and fluffy.

Beat in eggs and vanilla extract, then mix in the flour mixture until just combined.

With a standard cookie scoop, scoop the dough, scraping off the excess as you go up the bowl.

Flatten the dough slightly in your hand and place a caramel in the center.

Work the dough around the caramel sealing VERY well (so the caramel won't leak out).

Place the cookies two inches apart on the sheets.

Bake 12 to 14 minutes or until golden brown around the edges.

After baking, carefully slide the parchment with the cookies onto the counter.

Let cool until they are no longer soft but still slightly warm.

Twist gently to remove, and cool the rest of the way upside down on the parchment or on a cooling rack.


Makes 51 cookies.

Monday, August 20, 2012

Blackberry Cheesecake Torte

I'm sure you've heard this from me before, but you're not going to find a lot of cheesecake recipes on here. Whenever I see a recipe that takes 4 blocks of cream cheese, I skip over it, no matter how good it looks. I could tell myself, "The serving sizes are very small, so it's not so bad." But who am I kidding? No one's taking a tiny slice if it's that good. But this recipe miraculously only uses ONE! And it is oh, so good. I got it off the back of the package of blackberries, which isn't always the best source, and I'm not a huge fan of blackberries anyway, but the result was amazing. You've got to try it!

Printable Recipe

Blackberry Cheesecake Torte


1 package (12 oz) frozen blackberries, thawed and drained
1 cup granulated sugar, divided
1/2 tsp ground cinnamon
9-inch graham cracker crumb crust
1 package cream cheese (8 oz), softened
2 large eggs


In a small bowl, combine 1/2 cup sugar & cinnamon, and sprinkle over the berries, tumbling and coating them. Let sit 10 minutes.

In an ample bowl, beat cream cheese and 1/2 cup sugar on medium speed until well blended.

Beat in eggs, one at a time.

Pour filling into the crust.

Bake at 300 degrees for 40 minutes, until filling is set.

Remove from the oven, and arrange berries on top.

Bake 10 minutes, until the sugar on the berries is melted.

Let the torte cool partially.

Top with whipped cream if desired. Serve warm

Makes 8 servings.

Saturday, August 18, 2012

Fluffy Pancakes

Pancakes are one of my absolute favorite breakfast foods, and I love it when they're tall and fluffy. But I've always had trouble getting them just right. We've tried several different recipes that have been pretty good, but this one had 5 stars and almost 4,000 reviews, so I figured it must be pretty good. It definitely lived up to it's name of "Fluffy Pancakes." They didn't take a lot of work, but I think in the future I'm going to try buttermilk instead of the soured milk, just to see if there's any difference in taste. If you have a smaller family, you can cut this recipe in half, but this barely fed three boys and I even without my husband home.

Printable Recipe

Fluffy Pancakes 


1-1/2 cups milk
4 tablespoons white vinegar
2 cups all-purpose flour
4 tablespoons sugar
2 teaspoons baking powder
1 teaspoon baking soda
1 teaspoon salt
2 eggs
4 tablespoons butter, melted


Combine milk with vinegar in a medium bowl and set aside for 5 minutes to "sour".

Combine flour, sugar, baking powder, baking soda, and salt in a large mixing bowl.

Whisk eggs and butter into "soured" milk.

Pour the flour mixture into the wet ingredients and whisk until lumps are gone.

Heat a large skillet over medium heat, and coat with cooking spray.

Pour 1/4 cupfuls of batter onto the skillet, and cook until bubbles appear on the surface.

Flip with a spatula, and cook until browned on the other side.


Makes 16 pancakes.

Thursday, July 26, 2012

Dutch Babies (aka German Pancakes)

This is another recipe that's been sitting in my box, waiting to be made. Most people call these German pancakes, but I was looking at one recipe that had a review from a woman who was actually German, and she said true German pancakes would be heavy and fried in oil. These definitely are not, so I'm going with the more fun name of Dutch Babies. This is actually a mix of a couple different recipes, and it worked for us. I ended up cutting it in half since it was just the boys and I (and partially since I've become stingy with eggs since they got so expensive), but it was gone so quickly that I probably should have made the full batch. Sorry for the rushed picture. I had two boys fighting over who was going to smell the pancake.

Printable Recipe

Dutch Babies


4 Tbsp. butter
6 eggs
1 cup flour
1 cup milk
1/2 cup sugar
Pinch of salt


Preheat oven to 400.

Place butter in 9 x 13 pan (or 2 round pans) and let melt in oven as it preheats. Do not let the butter brown.

Combine eggs, flour, milk, sugar and salt. Whisk until smooth.

Pour batter into pan and bake for 15-20 minutes, or until middle is set and edges are puffed up and brown.

Serve with syrup, fruit, whipped cream, or powdered sugar & lemon juice. (We did the latter because that's my favorite way to do crepes--you can skip the lemon juice if you want.)

Monday, July 23, 2012

Red Pepper Chicken

This is another one of those "trust me" recipes. We got this from my brother-in-law Carlos, and I can't quite remember if it's one he made up or something that they eat in Chile (or Cuba--sorry, family joke but I couldn't help it). I think it's the latter--but Chile, not Cuba. Oh my, I'm off to a rough start. Anyway, we didn't really have a name for this, so I always called it Pulverized Chicken, which isn't the most appetizing name. And the picture doesn't make it look so great either, but it really, really is! Again, trust me. We either put it on warm French bread, as pictured, or it's great as a dip with Club crackers, or you can make it a regular sandwich. So yummy! Even my boys, who proclaim every time they see a red pepper that they HATE peppers, will eat this. And bonus that it's pretty easy. With the mayonnaise, I'm totally guessing on the quantity. I never measure, just add until it's a creamy consistency like the picture.

Printable Recipe

Red Pepper Chicken


1 red pepper
2 large boneless chicken breasts, frozen or thawed
1/2 cup mayonnaise (maybe more)
Salt to taste


Cut red pepper in half. Remove seeds and stem.

Place chicken in a pot of water. Boil until almost cooked through, then add pepper to boiling water.

Continue boiling until pepper is soft.

Drain water; roughly chop chicken and pepper.

Place into food processor and process until everything is finely chopped.

Add mayonnaise and salt, and process again. Add more of each as needed for taste.

Serve on French bread, with crackers, or as a sandwich.

Sunday, July 22, 2012

Peanut Butter Fudge Iced Brownies

I've had the recipe for this old-fashioned peanut butter icing stored away for awhile and finally got around to making it. It's probably good I waited, since I keep sneaking in and cutting off a piece of brownie when no one's looking. One of my boys even declared it as "the best brownie I've ever had." Should I be offended that I took the quick way out and made a boxed mix instead of making some of my other amazing brownies? This one is the best? Technically it's more about the icing, so I can accept that.

Printable Recipe


Peanut Butter Fudge Iced Brownies
from Southern Plate


1 box brownie mix, prepared according to package directions (or your favorite recipe)
1-1/2 cups sugar
7 tablespoons milk
2 tablespoons shortening
2 tablespoons margarine
1/4 teaspoon salt
1 teaspoon vanilla
1/2 cup creamy peanut butter


Prepare brownies according to package directions and allow to cool completely before beginning icing.

In heavy saucepan combine the sugar, milk, shortening, margarine, and salt.

Bring to a rolling boil while stirring constantly.

Once it reaches a rolling boil, stop stirring and let boil for two minutes.

Remove from heat and quickly stir in the vanilla and peanut butter.

Beat until smooth and quickly spread over the brownies.

Allow to cool completely and then serve.

Tuesday, July 17, 2012

Strawberry Shortcake

No real recipe, but we made a few loaves of Strawberry Pecan Bread, and I thought we should use it for the base of Strawberry Shortcake like I had mentioned. AMAZING!!! By far the best strawberry shortcake I've ever had! Seriously, please make this soon. And invite me over for some.


Strawberry Shortcake


Sunday, July 15, 2012

Pita Bread

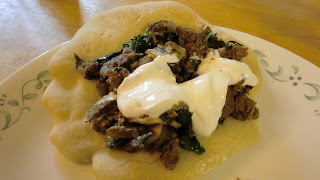
It's been far too long since I posted, I know. Life got a little crazy--finishing up Joy School for the year, getting ready to move, starting my business, and a hundred million other things. But I've still been making lots of new recipes, so there are plenty saved up to share. I wanted to start with this pita bread because I've had it saved in my file for a long time, but anytime there's a bread recipe, I automatically think it's going to be difficult and take forever. Not so! This one is very simple--you add all of the ingredients in the first few minutes, and while there's some wait time, it's not nearly as long as you would think. And it ends up being another one of those "I can never buy these from the store again because these are SO much better homemade" recipes, which is another reason it's so nice that it's a fairly simple recipe. We made these to use with Beef and Vegetable Pitas, and wow is all I can say.

Printable Recipe
Pita Bread


3 cups flour, plus 1/2-3/4 cup more as needed
1 ½ tsp. salt
1 tbsp. sugar or honey
1 packet instant (RapidRise) yeast (this equals 2 1/4 tsp.)
1 ¼ to 1 ½ cups water, roughly at room temperature
2 tbsp. olive oil, vegetable oil, butter or shortening


Mix the flour, salt, sugar and yeast.

Add the olive oil and 1 ¼ cup water and stir together with a wooden spoon until it forms a ball.  If some of the flour will not stick to the ball, add more water.

Place the ball on a work surface, and knead the dough for approximately 10 minutes. If you are using an electric mixer, mix it at low speed for 10 minutes. As the dough is mixing, continue to add flour, a tablespoon or two at a time, until the dough clears the sides of the bowl and is tacky but not sticky.  (I add a significant amount of flour, so don’t be afraid to keep adding more until you reach the right consistency.)

Place the dough in a bowl that has been lightly coated with oil. Form a ball out of the dough and  roll it around so that it has a light coat of oil on all sides. Cover the bowl with plastic wrap or a damp towel and set aside to rise until it has doubled in size, approximately 90 minutes.

When it has doubled in size, punch the dough down to release some of the trapped gases and divide it into 8 equal pieces.  

Roll each piece into a ball, cover the balls with a damp kitchen towel, and let them rest for 20 minutes. This allows the dough to relax so that it will be easier to shape.

Spread a light coating of flour on a work surface and place one of the balls of dough there. Sprinkle a little bit of flour on top of the dough and use a rolling pin or your hands to stretch and flatten the dough. You should be able to roll it out to between ¼ – 1/8” thick – 6 inches in diameter. If the dough does not stretch sufficiently, you can cover it with the damp towel and let it rest 5-10 minutes before trying again.
 
Place discs on a lightly greased baking sheet or parchment paper and let rise, uncovered, until barely doubled in thickness, about 30-45 minutes.

While the dough is rising, preheat the oven to 450°. If you have a baking stone, put it in the oven to preheat as well. If you do not have a baking stone, turn a cookie sheet upside down and place it on the middle rack of the oven while it is preheating. This will be the surface on which you bake your pitas.

Once the dough has risen, open the oven and place as many pitas as you can fit on the hot baking surface. They should be baked through and puffy after 3 minutes. If you want your pitas to be crispy and brown you can bake them for an additional 3 to 5 minutes, but it isn’t necessary.

Makes 8 pitas

Thursday, June 7, 2012

Strawberry Pecan Bread

I know the last few posts have all been desserts, but I'm not even going to apologize. First, these recipes have been so good, it's a crime not to share them; and second, if you can't find a good meal in all the posts so far, I don't think there's much more I can do. :) We had some strawberries that were barely hanging on, and I was afraid I'd have to throw them out, until I remembered seeing this recipe a few days ago. I can't say enough good things about this bread. Absolutely wonderful! Moist, just the right amount of sweetness, and perfect for a snack anytime. This is one you have to try!

Update: I found this recipe on another blog (http://www.thecountrycook.net), and she suggested using this a base for strawberry shortcake, with strawberries and whip cream. I think I'm going to have to try that!

Printable Recipe

 Strawberry Pecan Bread

Prep Time: 10 mins.   Bake Time: 45 mins.

1 cup fresh strawberries, washed and sliced
1 cup white sugar, plus two tablespoons
1-1/2 cups self rising flour
2-1/4 tsp. baking powder
3/4 tsp. salt
1/2 cup vegetable oil
2 eggs, beaten
1-1/2 tsp. ground cinnamon
1 cup chopped pecans


Place strawberries in a small bowl and pour two tablespoons of sugar over them. Stir and set aside.

In mixing bowl, place flour, baking powder, salt, remaining sugar, oil, eggs, and cinnamon. Mix until well combined.

Add pecans and strawberries and mix again until well combined.

Pour into greased and floured loaf pan.

Bake at 350 for 45-50 minutes, or until toothpick inserted in center comes out clean.

Allow to cool in pan ten minutes before turning out of pan to cool completely.

Wednesday, June 6, 2012

Brown Butter Creamy Apple Pie

I was so excited to make this pie again so I could get a picture of it to post. Got everything ready, made it, took the picture, and ate it, but something seemed just a little wrong. It wasn't until I was looking at the picture that it dawned on me--I forgot the streusel topping! So, picture this pie with a delicious, crumbly topping. That said, this is one of the best apple pies I've ever had. I guess you can skip the homemade whipped topping if you're trying to save time, but it's such a bonus that I don't recommend it. I had extra whipping cream left over anyway from making White Chicken Pizza and Caramel Pecan Brownies, so it was a nice way to use up the rest of the container. Hmm, don't think about calories with that menu. But this pie is the healthiest choice, right? It's full of fruit! The hardest part is waiting the extra two hours to let it cool, but you can do it!

Printable Recipe

Brown Butter Creamy Apple Pie
from Pillsbury


Filling

¼ cup butter
½ cup granulated sugar
1 egg
2 tablespoons all-purpose flour
1 teaspoon vanilla
5 cups sliced peeled Granny Smith apples (5 medium)

1 frozen deep dish pie crust

Streusel

½ cup all-purpose flour
¼ cup granulated sugar
¼ cup packed brown sugar
¾ teaspoon ground cinnamon
¼ cup cold butter

Topping

½ cup whipping cream
1 tablespoon powdered sugar
¼ teaspoon ground cinnamon
½ teaspoon vanilla


Place cookie sheet in oven to heat, then preheat to 400°F.

In 1-quart saucepan, cook 1/4 cup butter over medium heat, stirring constantly, until melted and lightly browned.

Cool completely, about 15 minutes. 

In large bowl, beat 1/2 cup granulated sugar and the egg with wire whisk until light and fluffy.

Beat in 2 tablespoons flour and 1 teaspoon vanilla.

Beat in cooled butter.

Gently stir in apples.

Pour into crust-lined pie plate. 

In medium bowl, stir together all streusel ingredients except butter.

With pastry blender or fork, cut in 1/4 cup butter until mixture looks like coarse crumbs.

Sprinkle over apples.

Place pie on cookie sheet in oven. 

Bake 20 minutes.

Reduce oven temperature to 350°F, and cover edge of crust with strips of foil to prevent excessive browning.

Bake 40 to 50 minutes longer or until apples are tender and crust is golden brown.

Cool 2 hours. 

In small bowl, beat whipping cream until soft peaks form.

Add remaining topping ingredients; beat until stiff peaks form.

Pipe or spoon onto pie.

Monday, May 28, 2012

Caramel S'more Bars

When I saw this a few days ago, I already had everything planned out that I was taking to the barbecue on Memorial Day. But I'm pretty susceptible to the powers of suggestion, so when I read that these bars would make our get together "spectacular", I had to agree. And it doesn't hurt that I LOVE S'mores. Which means I'm having a love affair with these bars. Wish I could share them with you all, but you'll just have to whip up your own!

The only thing I had an issue with was the caramel sauce. I had to let it boil a little longer than this says because it was still pretty liquidy (I had already added the vanilla and salt, and was letting it cool, but it wasn't setting up). For some reason, there are issues anytime I make a recipe from someone in Utah. I'm guessing there's some kind of climate difference that I'm not taking into account. Or that it's been raining. Anybody have a degree in food chemistry? I'm leaving the recipe the same, but you might have to add a couple extra minutes of boiling.

Printable Recipe


Caramel S'more Bars


Prep. Time: 10 min.  Bake Time: 13 mins

 14 whole graham crackers (about 1 1/2 packages)
1 (12 ounce) package milk chocolate chips
1/2 cup pecans, chopped
5 cups mini marshmallows
1 cup butter
1 cup brown sugar
1 tsp. vanilla
dash salt


Preheat oven to 350.

Place a Silpat or parchment paper on a large cookie sheet.

Break each graham cracker in half and lay it out on the pan. Don't worry if the edges of the crackers don't all touch; the caramel will help to bind them together.

Spread the chocolate chips out evenly over the crackers and sprinkle them with the chopped pecans.

Toss the mini marshmallows evenly over the top of the chocolate.

Place butter and brown sugar in a medium sized sauce pan.

Heat it on the stove over medium high heat, stirring occasionally.

Once the mixture starts to boil and the ingredients have combined well and are no longer separated, remove the pan from the heat, and stir in 1 teaspoon vanilla and a dash of salt. (You might need to boil it a little longer and then allow to cool just a bit so it can set up).

Drizzle the caramel all over the top of the marshmallows.

Bake at 350 for 12-13 minutes. You want to watch for the marshmallows to puff up and get golden brown along the tops.

Remove the pan from the oven and let the bars cool completely before cutting. They are much easier to cut if the chocolate and caramel has had time to set up.

After the bars have come to room temperature, you can put the pan in the fridge for 10 minutes or so for the chocolate to set up, or if you'd like them a little more gooey, skip the refrigeration and eat them as is.

Makes 30 to 40 bars.

Saturday, May 26, 2012

Awesome Oatmeal Cookies

I've searched long and hard for the perfect oatmeal cookie recipe. After countless attempts, I think this one is it. While I've never had an oatmeal cookie from Starbucks, I kept running across descriptions that include "cult-following" and "absolute be all end all best oatmeal cookie I had ever tasted", so I knew we had to try it, and this does makes a dang good cookie. Because the Commissary was out of the big box of dark raisins, I had to get the tiny boxes and empty them all out (see what I do for the sake of a picture?). This also taught me that the little boxes are a rip-off. It took all but two of them for my 1/2 cup. Go with the big box.

Printable Recipe


Awesome Oatmeal Cookies


1 stick margarine, softened
1/2 cup packed dark brown sugar
1/4 cup (granulated) sugar
1 large egg
1 teaspoon ground cinnamon
1-1/2 cups old-fashioned oats
1/2 cup all purpose flour
1/2 cup dark raisins (plus more for putting on top)
1/2 cup golden raisins (plus more for putting on top)
1/3 cup dried cranberries
1 teaspoon vanilla extract
1/3 cup diced walnuts, optional
1/4 teaspoon baking powder
1/4 teaspoon baking soda
1/2 teaspoon salt


Place sugars and margarine in mixing bowl. Mix until well blended.

Add egg and cinnamon, and mix again.

In separate bowl, place all remaining ingredients.

Stir with a spoon and dump into mixing bowl with wet ingredients. Mix until well blended.

Spoon by heaping tablespoonfuls onto greased baking sheets.

Top with a few additional raisins of each color.

Bake at 350 for twelve to fifteen minutes until the edges are lightly browned.

Remove from oven and allow to cool for a few minutes before removing from cookie sheets and cooling completely.

Makes about 2 dozen

Friday, May 25, 2012

Chicken & Salsa

One of our favorite older shows is Seinfeld, and in my opinion, the best character is Elaine's on-again, off-again boyfriend Puddy. And the best episode is "The Face Painter" where Puddy asks, "How come people don't have dip for dinner? Why is it only a snack? Why can't it be a meal, you know?" So every time we have this, that's what I'm thinking. Dip CAN be a meal.

This is another one of those "trust me" recipes. Why is it that so many of my favorites just don't come across in the pictures? This one really is so, so good. I always thought of it as a meal that wasn't that great for you, but when I broke it down, it's not as bad as I thought. Salsa is pretty good for you, and since it makes a lot of servings, there isn't a whole lot of cream cheese in each serving. And if you get baked tortilla chips, even better!

There are two rules though: you need to make this a day ahead of time and let it sit in the fridge (it tastes so much better after it's been allowed to marinate together) and you have to use corn and black bean salsa. Okay, they both might just be my preferences, but I've made this so many times that I should know, right? The absolute best brand of salsa is the Meijer brand (if you live in the Midwest), or the Kroger Private Selection brand (I know it's available at Fred Meyer, and there are lots of Kroger chains under different names that probably carry it).

Printable Recipe

Chicken & Salsa


2-3 boneless, skinless chicken breasts, frozen or fresh
1 jar (24 oz) corn and black bean salsa
12 oz. cream cheese
Tortilla chips


Place chicken in crock pot.

Pour salsa over top.

Cook on high 4 hours.

Remove chicken and shred.

Add cream cheese to salsa and mix until combined; add chicken to mixture.

Store for one day in refrigerator, then serve. May be served either cold or warm with tortilla chips.

Wednesday, May 23, 2012

Baked Steak Burritos

This is one of my favorite ways to make burritos. I'm not a big fan of enchilada sauce (I like the tortillas to have more crunch), so I don't use the whole can. And while the original recipe said it made 12, I've never gotten more than 8.


Baked Steak Burritos


1/4 cup butter
1 package (1 oz) taco seasoning mix
1 1/2 lb boneless beef sirloin tip steak, cut into thin bite-sized strips
1 can (16 oz) refried beans
8 flour tortillas (6 inch)
2 cups Cheddar cheese, shredded
3 green onions, thinly sliced
1 can (10 oz) red enchilada sauce
1 cup Mexican cheese blend, shredded
Shredded lettuce
Sour cream


Heat oven to 400°F.

Melt butter in large skillet over medium heat.

Stir in taco seasoning mix.

Add beef strips; cook and stir 5 to 6 minutes or until of desired doneness. Drain.

Meanwhile, place refried beans in microwave-safe dish. Microwave on HIGH for 2 minutes, stirring once or twice.

Spread each tortilla with refried beans to within 1/4 inch of edge.

Top each with beef, Cheddar cheese and green onions.

Roll up, folding in sides.


Place, seam side down, in ungreased 13x9-inch (3-quart) glass baking dish.

Pour enchilada sauce over burritos.

Sprinkle with Mexican cheese blend.

Bake at 400°F. for 7 to 12 minutes or until burritos are thoroughly heated and cheese is melted.

Top with shredded lettuce and sour cream.

Makes 8 servings.

Serve with: Knorr Spanish Rice

Freezer Meal: You can assemble the burritos, then freeze before baking. When ready to make, defrost and bake as normal.

Saturday, May 19, 2012

Baked Apples

It was cloudy and cool out today, so even though it's nearing the end of May, it felt more like fall weather. And that made me want apples and cinnamon. We went with baked apples. It's a pretty simple recipe, but it sure was a nice dessert. We topped it off with caramel sauce.

Printable Recipe
 
 Baked Apples


1 teaspoon ground cinnamon
1/4 teaspoon ground nutmeg
1/2 cup sugar
6 same-size Granny Smith apples
2 tablespoons butter, cut into 6 teaspoon-size pieces
1 cup apple juice
Caramel sauce (optional)


Preheat oven to 325 degrees F.

Combine cinnamon, nutmeg, and sugar in a small bowl. Set aside.

Core apples, making sure not to puncture the bottom of the apples so that the juices will remain inside.


Remove skin from 1/2-inch around top of apples at the opening.

Fill each cavity with the cinnamon-sugar mixture.

Top each apple with a teaspoon of butter.

Place apples in casserole dish and pour apple juice around them..

Cover pan with aluminum foil and bake for approximately 45 minutes to 1 hour.

Remove from heat, garnish with caramel sauce if desired, and serve.

Friday, May 18, 2012

Elegant Chicken

And so the feud continues. As I said yesterday, Elegant Chicken is my favorite. I'm going to say that Anthony probably prefers the Bacon Ranch Slowcooker Chicken simply because he's had Elegant Chicken so many more times. Because truly, this one is the better choice.

I'm adding this warning though--DO NOT use low-fat cream cheese. Yes, we all want to save calories where we can. This is not the place. I thought I had regular cream cheese in the fridge, but we'd run out, so I tried to substitute. Ugh. Nowhere near the flavor it should have. Trust me on this one.

Printable Recipe


Elegant Chicken


2-3 boneless chicken breasts
1/4 cup butter
1 pkg. dry Italian Seasonings Dressing Mix
1 can cream of chicken soup (you can do cream of mushroom, but I think chicken is so much better)
8 oz. cream cheese
Noodles (Fettucine, Linguine, Egg Noodles, or may also be served over rice)


Place chicken and butter in crock pot.

Sprinkle with seasoning mix.

Cook on low until tender, about 4 hours.

Shred chicken and return to crock pot.

Add soup and cream cheese and mix well.

Cook half an hour more.

While sauce is finishing, prepare noodles (or rice) according to package.

Serve immediately.


The sauce can be made ahead of time and frozen for a quick freezer meal.

Thursday, May 17, 2012

Bacon Ranch Slowcooker Chicken

Our house is divided. When Anthony and I started dating, I was introduced to Elegant Chicken (coming soon) at Sunday dinners with his family. One of my favorites! And then a few months ago, I ran across this recipe. It is a similar idea, and even though the ingredients are different, it seems like the same family, like their cousin recipes--sour cream instead of cream cheese, Ranch dressing instead of Italian, etc. So I thought I'd try it. But then came the problem--Anthony has declared this better than Elegant Chicken, and while I definitely enjoyed this one, I still prefer the other. I'll let you make the final decision for your home, and I hope I don't cause too much contention.

Some people say the Ranch is a little strong, or it's too salty, and they used only part of the package. I was fine with the whole thing, but you might need to experiment. I also used regular sour cream. Fat-free has a tendency to become chunky when I cook with it, especially in recipes like this where it cooks for an extended period, and it changes the consistency. If you make the switch back too, just adjust the calories (which is still pretty low even with regular sour cream).

Printable Recipe

Bacon Ranch Slowcooker Chicken


2 turkey bacon strips, cooked and shredded
1 tsp minced garlic
1 package Ranch dressing mix
1 10.75 oz can condensed cream of chicken soup (98% fat free)
1 cup fat-free sour cream
16 oz. chicken breasts, frozen or defrosted/raw
8 oz. pasta (I used rigatoni), cooked

Combine the first five ingredients.

Place frozen or defrosted/raw chicken in slowcooker sprayed with nonstick cooking spray and pour sauce over the top.

Cook on high for 3.5 hours. Shred chicken with two forks.

Cook pasta per package instructions on stove.

Serve chicken over pasta.

Nutritional Information: 456 calories, 61 carbs, 5 fat grams and 36 protein grams (according to the original author)

Makes 4 servings

Sunday, May 13, 2012

Sweet Corn on the Cob

Bet you didn't know you needed a recipe for corn on the cob. You do. You really do. And I'm not just talking about a technique on how long to boil it. This is a recipe. One of the issues I've had with Alaska is that our produce is "slightly" lacking in freshness and flavor. And being from the Midwest, I know that corn is best right after you pick it. During dinner, my husband was telling me about a Sweet Corn Festival he attended in Idaho. It was held at the fairgrounds, and there was a field of sweet corn right next to it. If you wanted an ear of corn, you'd pick it, run as fast as you could, and drop it in a pot of boiling water. I'm pretty sure our corn isn't making it to the pot quite so quickly (and to add insult, I've seen it being sold here for $1.19 an ear). This recipe takes care of the lack of freshness by adding back in the sweetness. And it was truly amazing. Just like the original blogger said (she called it "The Only Corn on the Cob I Will Ever Make Again"), we didn't need to spread on any butter or salt before eating it, and the flavor was perfect.

Printable Recipe

Sweet Corn on the Cob

6–8 ears corn, husks and silk removed
1 1/4 cup milk
1/3 cup brown sugar
1/4 cup butter


Fill a large stock pot half full with water (use a large enough pot to hold all the corn).

Add in the milk, sugar and butter.

Bring to a boil, then add in the corn cobs.

Reduce heat to a simmer and allow corn to cook for 7 to 8 minutes or until just tender, depending on size of corn. Try not to over cook the corn as it will become tough.

Using tongs, remove and place on a plate or in a bowl, then cover with foil until ready to serve.

Saturday, May 12, 2012

Unfried Fried Ice Cream

I've only had fried ice cream once, when I was about 12 years old, but I remember thinking that it was pure heaven. I even have a recipe for fried ice cream that's been sitting in my binder for years, but I've never attempted it. When I saw this recipe on Southern Plate, it seemed like the best of both worlds. The delicious flavor without actually frying! My boys love Honey Bunches of Oats (the Almond variety--they ask for "Flakes with Nuts" when I ask what they want for breakfast), but I hate that the end of the bag has so many crumbs left over. So I've gotten in the habit of pouring the crumbs into a plastic baggie (because there are always a lot of decent-sized flakes mixed in), and we save it up until we have enough to make these. Always a favorite, and it's super easy but impressive enough for all of us.

Printable Recipe

Unfried Fried Ice Cream


1/2 gallon Vanilla ice cream
3 cups Honey and Oats Cereal (or any cereal you'd like to try--get creative!)
3 Tbsp. butter
3 Tbsp. sugar
1 Tbsp. cinnamon


Scoop frozen ice cream out onto waxed paper lined baking sheets and place in freezer for at least an hour, or until hardened. 

During that time, place cereal in gallon zipper bag and crush. (Since I had the cereal saved in a small bag, and it was already crushed, I just mixed the cereal into the bowl with the rest of the ingredients.)

Melt butter in microwave, and stir in sugar and cinnamon.

Pour into bag with cereal and seal.

Knead with hands until well mixed.

Pour out onto lined baking sheet and place in oven at 350 just until toasted, about five minutes. Keep close watch as cereal will burn easily.

Remove from oven and allow to cool.

Roll hardened ice cream balls in mixture, pressing lightly as you do so.

Place coated ice cream in 9x13 dish and return to freezer or serve immediately. 

For serving, drizzle with honey and top with whipped cream and a cherry.

Makes 10 scoops.